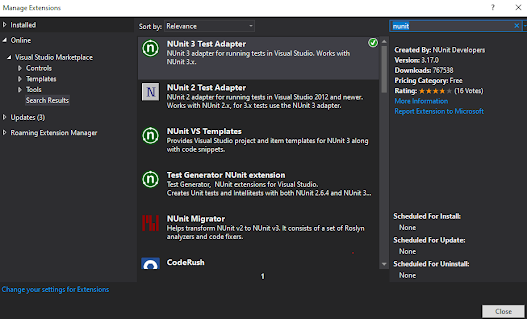
Add the extension to project

 4)Click on Extensions => Manage Extensions.

§  Go to online

§  Search Specflow

§  Select specflow for visual studio 2019 and download.

§  Follow the same step to download Nunit in search

§  Download Nunit latest version.


5)Go to Solution Explorer=>Right click on Reference

·         Click on Manage Nuget packages

6) In the Search Box, search for RestSharp. This will take few seconds to populate the results. Once done, just select RestSharp and click on Install to start the installation process. Install following.

·         RestSharp

·         RestSharp.NewtonSoft.Json

·         Specflow

·         Specflow.Assist.Dynamic

·         Specflow.Nunit

·         Specflow.Tools.MSBuild.Generation

·         Nunit


Comments

Popular posts from this blog

Specflow Tables – Convert Table to Dictionary

            Tables can be used both vertically and horizontally. In the first table examples, we'll use the Data Vertically as a Key-Value pair, which the Dictionary object allows. 1) Add a New Step The first step is to create a new Step that will accept data in the form of a table. It is once again simple to specify data for the step in Vertical format. Let's look at how to pass Vertical Data in the same Users scenario that was used in the previous SpecFlow :   Feature : Users        Operations about user   Background :        Given I perform api operation on petstore server " https://petstore.swagger.io/v2/ "   Scenario : POST operation with table        When I perform POST operation for User using endpoint " /user " using table data               | Key         | Value                |               | Id          | 2                    |               | username    | Ravi                 |               | firstname   |

Specflow Tables – Convert Table to Data Table

                 Vertical Data Using Tables was covered in the previous chapter of Covert Table into Dictionary. When we have a long list of Data, this is useful. Personal information includes first and last name, address, and job title, among other things.                However, this has some limitations. For example, if we want to repeat the same step, it is difficult to manage with a Dictionary Key-Value pair. To obtain the functionality, Horizontal Data must be used rather than Vertical Data, which can be accomplished by using the “Convert Table into Data Table” command. Table to Data Table Conversion We will use the same example of the Users Feature and modify it to suit our needs. Before proceeding, please review the first chapter of Data Driven Testing and see how the basic functionality works for the Users Scenario. 1) Add a New Step The first step is to create a new Step that will accept data in the form of a table. It is once again simple to specify data for the st

Json Response Deserialization

  How Do I Deserialize a JSON Response to a Class Using Rest Sharp? Let's continue from the earlier section, Creating a POST request with Rest-Sharp. In the earlier section, we made a successful post request and received the Response body shown below. To validate parts of the Response body, we used JObject.Parse. We will make this Response body into a Class. Deserialization of JSON refers to the process of converting a JSON or any structured data, including XML, into a programming class. Deserialization refers to the process of converting JSON from its String form to its Class form. This is also known as structured data object representation. JSON is used to represent structured data in this case. To integrate the JSON to a Class representation, we will first create a Class that contains all of the nodes in the JSON. There are three nodes in the Success response above. ·          Success code ·          Type ·          Message String is the value of these three nodes